
Hadoop & HBase — Hello World
Hadoop & HBase — Hello World
Hadoop & HBase — Hello World
Ever since seeing the picture of the cute little stuffed elephant on the page, I was excited about Hadoop. I was also excited about the potential to quickly build large-scale, distributed applications, but I was mainly excited about the elephant.
Harnessing that enthusiasm, this post will document how to build a venerable “hello world” example using Hadoop & Hbase. Hbaseis a non-relational, distributed database modeled after Google’s BigTable. Hbase runs on top of Hadoop, which, in this example provides a distributed file system where HBase’s data sits.
Step 1: Install the Operating System in a VM
First off, I’ve downloaded Ubuntu 12.04 Server, 64 Bit edition, and installed it in a Virtual Machine. I’ve used VMware Workstation 8.0.3, but VirtualBox will work just as well. You’ll also want to install a text editor, such as VIM (here’s a tutorial for those who haven’t used it before):
sudo apt-get install vim

Step 2: Modify Hosts File
I ran into a number of unusual issues initially when trying to get HBase to start, and they were caused by an incorrectly configured /etc/hosts file. I would have saved myself hours if I’d actually read the Hbase documentation. Open the /etc/hosts file using:
sudo vim /etc/hosts
Change the following host mapping, from:
127.0.0.1 localhost
127.0.1.1 ubuntu
to this:
127.0.0.1 localhost
<machineIPAddress> Ubuntu
where <machineIPAddress> is the IP of the Virtual Machine. The Virtual Machine in this case is called “Ubuntu”. You can use iconfig on the VM to get your VMs IP Address.
In addition, you’ll need to modify the host file entry on your local machine so it can resolve the hostname of the Virtual Machine.
Step 3: Install Oracle Java Implementation
Hadoop is built and tested with the Oracle JVM, which is surprisingly a little difficult to install on Ubuntu. The easiest option is to use a prepackaged version; I ended up using this Duinsoft script to install it. Open the file /etc/apt/sources.list using:
sudo vim /etc/apt/sources.list
And then add the following item to the end of the file:
deb http://www.duinsoft.nl/pkg debs all
The next step is to import the key for the repository:
sudo apt-key adv — keyserver keys.gnupg.net — recv-keys 5CB26B26
Finally, install Java using the following two commands:
sudo apt-get update
sudo apt-get install update-sun-jre
Step 4: Install SSH
The next step is to install an SSH server; this is required to run Hadoop. I also find it a little easier to interact with the Virtual Machine through an SSH session, rather than through the VM interface. To do this, run:
sudo apt-get install openssh-server
Step 5: Hadoop User
Once the SSH server has been installed, a new user needs to be created to run Hadoop. To do this, run:
sudo addgroup hadoop
sudo adduser — ingroup hadoop huser
The huser needs to have a public key generated to allow it to connect to the server without a password. The first step is to login as the user:
sudo -i -u huser
Then generate the key, and add it to the allowed list of keys which can be used to connect:
ssh-keygen -t dsa -P ‘’ -f ~/.ssh/id_dsa
cat ~/.ssh/id_dsa.pub >> ~/.ssh/authorized_keys
Step 6: Download Hadoop
It’s now time to download the Hadoop Common package. Enter the following to download the 1.0.3 release to the husers home directory
cd ~
wget http://mirror.overthewire.com.au/pub/apache/hadoop/common/hadoop-1.0.3/hadoop-1.0.3.tar.gz
Once the file has downloaded, untar it with the following command:
tar -zxvf hadoop-1.0.3.tar.gz
A folder called hadoop-1.0.3 will now be in the home directory. Unfortunately the intended destination is protected, so you’ll need to use a user with sudo access to move the download. To do this, enter the following:
exit
sudo mv /home/huser/hadoop-1.0.3 /usr/local/hadoop
sudo -i -u huser
It’s now time to configure!
Step 7: Configure Hadoop
The newly copied Hadoop installation needs to have its JAVA_HOME variables set. To do this, navigate to the directory:
cd /usr/local/hadoop/conf
And then open the file hadoop-env.sh using the following command. This file contains some environment variable settings used by Hadoop:
vim hadoop-env.sh
Once the file is open, append the following line to it (you will need to update this depending on the java version installed):
export JAVA_HOME=/opt/java/32/jre1.6.0_31
Save the file.
The next important configuration step is to setup Hadoop. We’re going to be running Hadoop in a single-node setup. This is a very basic configuration, but it’s good for development. The first step is to create a folder on the filesystem for Hadoop to store its files:
mkdir /home/huser/hadoop_tmp
Once done, navigate to /usr/local/hbase/conf, and open up the file core-site.xml, and ensure the contents of it look like this:
<?xml version=”1.0”?>
 <?xml-stylesheet type=”text/xsl” href=”configuration.xsl”?>
 <configuration>
 <property>
 <name>hadoop.tmp.dir</name>
 <value>/home/huser/hadoop_tmp</value>
 </property>
 <property>
 <name>fs.default.name</name>
 <value>hdfs://ubuntu:8020</value>
 </property>
 </configuration>
The value for “fs.default.name” is the name of the default file system, and the value for “hadoop.tmp.dir” is the base for temporary files on the local file system. Once you’re done, save the file.
The Hadoop filesystem needs to be formatted with the new settings. To do this, execute:
/usr/local/hadoop/bin/hadoop namenode –format
Once done, the instance can be started with the following command:
/usr/local/hadoop/bin/start-all.sh
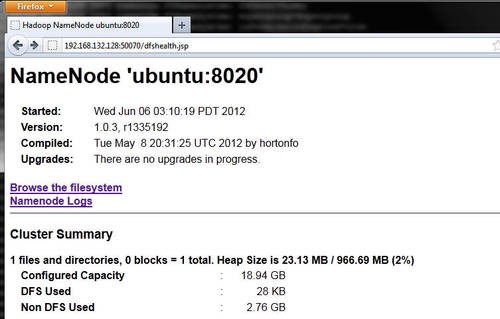
The Hadoop instance should now be running. To confirm this, go back to your host machine, and navigate to the following page in a web-browser
http://ubuntu:50070/dfshealth.jsp
Step 8: Adding a Hbase Directory in Hadoop
A directory needs to be made within the Hadoop filesystem to store the Hbase data. To do this, execute the following:
/usr/local/hadoop/bin/hadoop fs -mkdir hbase_dir
A directory now exists on the Hadoop file system, called /user/huser/hbase_dir, you should be able to see it through the web interface.
Step 9: Download HBase
The next step is to download HBase. Enter the following to download the 1.0.3 release to the husers home directory
cd ~
wget http://mirror.mel.bkb.net.au/pub/apache/hbase/hbase-0.94.0/hbase-0.94.0.tar.gz
Once the file has downloaded, untar it with the following command:
tar -zxvf hbase-0.94.0.tar.gz
A folder called hbase-0.94.0 will now be in the home directory. Again the intended destination is protected, so you’ll need to use a user with sudo access to move the download. To do this, enter the following:
exit
sudo mv /home/huser/hbase-0.94.0 /usr/local/hbase
sudo -i -u huser
Step 10: Configure Hbase
The newly copied Hbase installation needs to have its JAVA_HOME variables set. To do this, navigate to the directory:
cd /usr/local/hbase/conf
And then open the file hbase-env.sh using the following command. This file contains some environment variable settings used by Hadoop:
vim hadoop-env.sh
One the file is open, append the following line to it (you will need to update this depending on the java version)
export JAVA_HOME=/opt/java/32/jre1.6.0_31
Save the file.
The next step is to define the hbase setup. To do this, open the file using:
vim hbase-site.xml
And then ensure the contents of the file appear as follows:
<configuration>
 <property>
 <name>hbase.rootdir</name>
 <value>hdfs://ubuntu:8020/user/huser/hbase_dir</value>
 <description>
 </description>
 </property>
 <property>
 <name>hbase.master</name>
 <value>ubuntu:60000</value>
 <description>
 </description>
 </property>
 </configuration>
Now it’s all configured, it’s time to start Hbase up. To do this, execute:
/usr/local/hbase/bin/start-hbase.sh
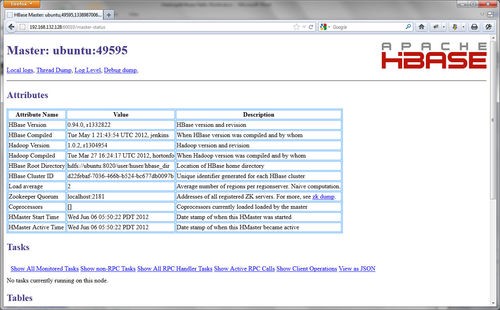
The application should now be running. To confirm this, go back to your host machine, and navigate to the following page in a web-browser:
http://ubuntu:60010/master-status
Step 11: Creating Your First Table
HBase contains its own shell, where you can interact with it. To start the shell, execute:
/usr/local/hbase/bin/hbase shell
Within the shell, enter the following command to create a new table called “words”, with a column family called “definitions”:
create ‘words’,’definitions’
The next step will be to load up some data. Obviously, you’d generally do this with your application, but for this tutorial we’ll used fixed data. Execute the following, one line at a time.
put ‘words’,’hello’,’definitions:1’,’A greeting (salutation) said when meeting someone or acknowledging someone’s arrival or presence.’
put ‘words’,’hello’,’definitions:2’,’A greeting used when answering the telephone.’
put ‘words’,’world’,’definitions:1’,’to consider or cause to be considered from a global perspective’
These commands insert two rows into the database, two for “hello”, and one for “world”. The “hello” row has two different columns within the “definitions” column family.
Step 12: Finally, Program Time
So all the prep work, is done, it’s time to run a sample program. I’ve attached below a simple Java class which queries the rows within this table and prints them out to the screen.
package au.com.gigliotti.sandpit.hbase;

import java.util.NavigableMap;
import java.util.NavigableSet;

import org.apache.hadoop.conf.Configuration;
import org.apache.hadoop.hbase.HBaseConfiguration;
import org.apache.hadoop.hbase.client.HBaseAdmin;
import org.apache.hadoop.hbase.client.HTableFactory;
import org.apache.hadoop.hbase.client.HTableInterface;
import org.apache.hadoop.hbase.client.Result;
import org.apache.hadoop.hbase.client.ResultScanner;
import org.apache.hadoop.hbase.client.Scan;
import org.apache.hadoop.hbase.util.Bytes;

/**
 * Sample HBase application which retrieves all rows from a table and then
 * prints them to the console. The table definition is as follows:
 *
 * table: words column family: definitions
 *
 * @author Gerard Gigliotti (gerard.gigliotti.com.au)
 *
 *
 */
public class HBaseSample {

// The name of the table being queried
 public static final byte[] WORDS_TABLE = Bytes.toBytes("words");
  // The column family
    public static final byte[] DEFINITIONS_FAMILY = Bytes
           .toBytes("definitions");

/**
    * Construct creates a new instance of HBaseSample, and invokes the start
    * method.
   */
 public static void main(String[] args) throws Exception {
       (new HBaseSample()).start();
    }

/**
     * Method prints out all rows within the words table.
    * */
   private void start() throws Exception {

// Load's the hbase-site.xml config
      Configuration config = HBaseConfiguration.create();
     HTableFactory factory = new HTableFactory();
        HBaseAdmin.checkHBaseAvailable(config);

// Link to table
     HTableInterface table = factory.createHTableInterface(config,
               WORDS_TABLE);

// Used to retrieve rows from the table
        Scan scan = new Scan();
// Scan through each row in the table
        ResultScanner rs = table.getScanner(scan);
      try {
           // Loop through each retrieved row
          for (Result r = rs.next(); r != null; r = rs.next()) {
              System.out.println("Key: " + new String(r.getRow()));
             /*
               * Cycles through each qualifier within the "definitions" family.
              * The column family, with the qualifier, make up the column
                 * name; it is usually represented in the syntax
                 * family:qualifier. In our example, each qualifier is a number.
                 */
             NavigableMap familyMap = r
                      .getFamilyMap(DEFINITIONS_FAMILY);
              // This is a list of the qualifier keys
             NavigableSet keySet = familyMap.navigableKeySet();
// Print out each value within each qualifier
             for (byte[] key : keySet) {
                 System.out.println("t Definition: " + (new String(key))
                           + ", Value:"
                          + new String(r.getValue(DEFINITIONS_FAMILY, key)));
             }
           }
       } catch (Exception e) {
         throw e;
        } finally {
         rs.close();
     }
As you’ll have noticed, the connection settings are not defined within the class. A separate file, called hbase-site.xml, which needs to be added to your classpath, contains the settings for connecting to Hbase.
The code can be downloaded from GitHub here.
That’s it; you’ll now have your very own singing and dancing Hadoop & Hbase instance.
References
- The HBase documentation is very useful: http://hbase.apache.org/book.html
- A great post about establishing a Hadoop instance: http://www.michael-noll.com/tutorials/running-hadoop-on-ubuntu-linux-single-node-cluster/
- Another great post, but focusing more on Hbase: http://ria101.wordpress.com/2010/01/28/setup-hbase-in-pseudo-distributed-mode-and-connect-java-client/