
Unit Testing Tivoli Identity Manager Workflows
At work, I’ve recently dabbled in the mysterious art of Tivoli Identity Manager (TIM) workflow development. TIM is an extremely flexible identity lifecycle management product, and part of this flexibility is due to the ability to write custom workflows with Javascript. However, the ability to write Javascript workflows is a double-edged sword; the product makes it very difficult to automate any unit testing of the workflows. Luckily, automated unit testing can be easily accomplished by leveraging a couple of different software packages.
We’re going to use a combination of the IBM Tivoli Identity Manager API Web Services Wrappers, an unsupported web-services interface which exposes the TIM Java API via SOAP, and we’re going to invoke it using SOAP-UI, an open-source testing tool which can invoke web-services. A match made in heaven.
The download and installation of the TIM Wrapper is straightforward, and it just sits within the same application server instance as TIM. Once you’ve installed the application, you can test that the wrapper is available by retrieving its WSDL through a web-browser http://<host name>:9080/ITIMWebServices/services/WSItimService?WSDL
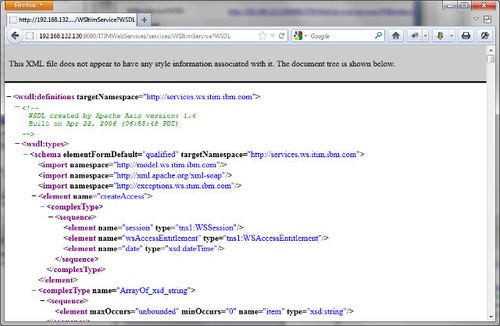
Once you’ve confirmed that the WSDL is accessible, it’s time to fire up SOAP-UI. Right click on “Projects”, and then select “New soapUI Project”. Add a new project name in, and enter the WSDL tested above. A new project should be created with all the operations. The WSItimService WSDL contains most of the TIM API, but not all of it; you might need to use one of the other services offered by the wrapper to access all of the API operations. Now we’re ready to setup our unit test extravaganza.
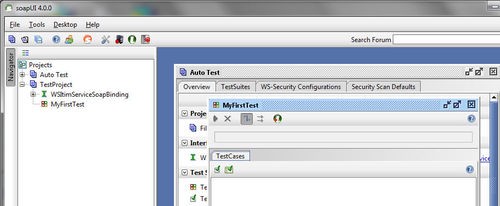
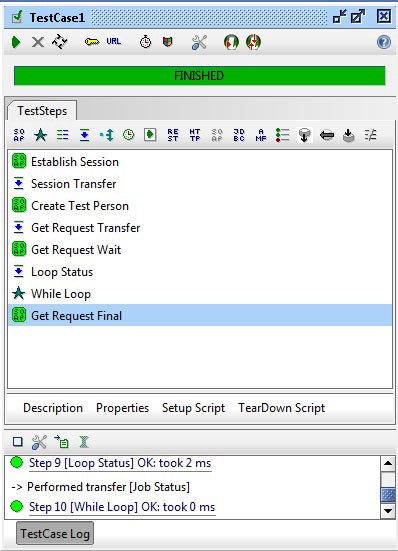
Right click on the project and click “New Test Suite”, and then enter a suitable name. The test suite can contain one or more test cases. Your new test suite will appear, and then right click within the white space of the dialogue and click “New TestCase”, and then enter “TestCase1” as the name. The following test case will appear:
The test case dialogue allows you to specify a set of steps to validate your test case. For our sample test case, we’re going to create a new person object in TIM, and then validate that it’s been successfully created.

The first step is to login to TIM. Almost all requests into TIM require a valid session, which can be established using the “WSItimServiceSoapBinding -> login” request. Click the “SOAP” labeled button within the testcase, and enter “Establish Session” in the name. A list of valid requests will then appear; scroll down and select the “WSItimServiceSoapBinding -> login” request. Click “Ok”. An “Establish Session” dialogue will now appear, containing a template SOAP message. To enable login, you’ll need to enter in a valid TIM user ID in the “principal” element, and the user’s password in the “credential” element. For example:
<soapenv:Envelope xmlns:soapenv="http://schemas.xmlsoap.org/soap/envelope/" xmlns:ser="http://services.ws.itim.ibm.com">
   <soapenv:Header/>
   <soapenv:Body>
      <ser:login>
         <ser:principal>itim manager</ser:principal>
         <ser:credential>superpassword</ser:credential>
      </ser:login>
   </soapenv:Body>
</soapenv:Envelope>
To test that you’ve done it correctly, click the green submit request button. If all has gone to plan, you should see a rather lengthy response, containing a “clientSession” and a “sessionID”. These two values are used in subsequent requests to maintain the session.
The next step is to create a person in TIM. Click the “SOAP” button again, but this time select the “WSItimServiceSoapBinding -> createPerson” request. The XML for this request is a bit more complicated, so I’ve mocked up a sample below. Copy the following piece of XML into the request field:
<soapenv:Envelope xmlns:soapenv="http://schemas.xmlsoap.org/soap/envelope/" xmlns:xsd="http://www.w3.org/2001/XMLSchema" xmlns:xsi="http://www.w3.org/2001/XMLSchema-instance">
   <soapenv:Body>
     <!-- This is a createPerson request -->
      <createPerson xmlns="http://services.ws.itim.ibm.com">
           <!-- The information within this session element is retrieved from the login response. We'll talk about setting these values later on-->
         <session>
            <ns1:clientSession xmlns:ns1="http://model.ws.itim.ibm.com">?????</ns1:clientSession>
            <content:enforceChallengeResponse xmlns:content="http://model.ws.itim.ibm.com">false</content:enforceChallengeResponse>
            <excerpt:locale xmlns:excerpt="http://model.ws.itim.ibm.com">
               <excerpt:country>AU</excerpt:country>
               <excerpt:language>en</excerpt:language>
               <excerpt:variant/>
            </excerpt:locale>
            <ns4:sessionID xmlns:ns4="http://model.ws.itim.ibm.com">?????</ns4:sessionID>
         </session>
      <!-- This is the container where the person will be created. This is a very simple TIM install, so we're just creating the person at the base ou. -->
         <wsContainer>
            <ns6:itimDN xmlns:ns6="http://model.ws.itim.ibm.com">erglobalid=00000000000000000000,ou=dev, DC=COM</ns6:itimDN>
            <ns8:select xmlns:ns8="http://model.ws.itim.ibm.com">false</ns8:select>
            <ns11:profileName xmlns:ns11="http://model.ws.itim.ibm.com">OrganizationalUnit</ns11:profileName>
         </wsContainer>
      <!-- This secion sets the attributes for the person being created. Again, this is a very simple person example. If you're creating a more complex example,
       it's usually easier to create a sample user through the GUI, and then lookup that person using an LDAP browser to determine the various attribute value. -->
         <wsPerson>
            <ns13:attributes xmlns:ns13="http://model.ws.itim.ibm.com">
               <item>
                 <!-- This sets the preferred UID for the user. The ${ } brackets contain a piece of Groovy code which will be executed before the request is sent to the server.
                     This piece of code appends a randomyl generated number to the UID.-->
                  <ns13:name>uid</ns13:name>
                  <ns13:values>
                     <item>UIDOne${=(int)(Math.random()*9999999)}</item>
                  </ns13:values>
               </item>
               <item>
                  <ns13:name>sn</ns13:name>
                  <ns13:values>
                     <item>Lee${=(int)(Math.random()*9999999)}</item>
                  </ns13:values>
               </item>
               <item>
                  <ns13:name>givenName</ns13:name>
                  <ns13:values>
                     <item>Peggy</item>
                  </ns13:values>
               </item>
<item>
                  <ns13:name>cn</ns13:name>
                  <ns13:values>
                     <item>Test CN</item>
                  </ns13:values>
               </item>
            </ns13:attributes>
            <ns15:name xmlns:ns15="http://model.ws.itim.ibm.com">UIDOne${=(int)(Math.random()*9999999)}</ns15:name>
            <ns16:select xmlns:ns16="http://model.ws.itim.ibm.com">false</ns16:select>
            <!-- The type of object being created, in this case, a person. -->
            <ns17:profileName xmlns:ns17="http://model.ws.itim.ibm.com">Person</ns17:profileName>
         </wsPerson>
         <date xsi:type="xsd:dateTime">2012-02-29T00:38:35.111Z</date>
      </createPerson>
   </soapenv:Body>
</soapenv:Envelope>
This piece of XML code however, is incomplete. We need to copy the session values from the “WSItimServiceSoapBinding -> login” response, into this new request. Luckily, SOAPUI has a “Property Transfer” function to copy the value into the second request. Go back to the Test Case view, and click the “Property Transfer” button and then specify a name (ie Session Transfer).
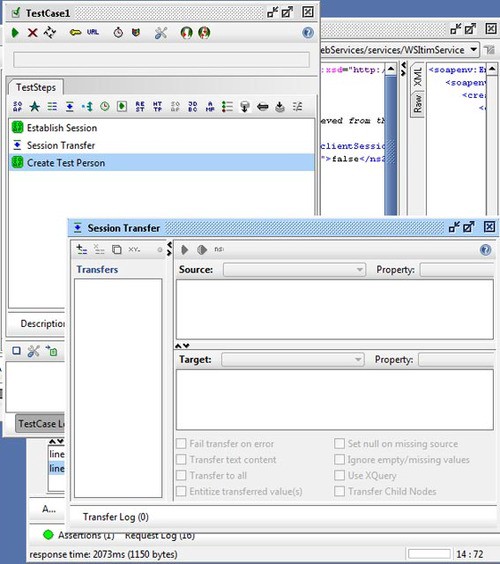
A session transfer dialogue will appear. Click the “Plus” button in the corner, and enter the name “ClientSession”. A dialogue will appear with “source” and “target” panels. In the “Source” panel, ensure “Establish Session” is selected, and the property is set to “Response”. Then set the following XPATH within the textbox:
declare namespace  soapenv="http://schemas.xmlsoap.org/soap/envelope/";
declare namespace ser="http://services.ws.itim.ibm.com";
//soapenv:Envelope/soapenv:Body/ser:loginResponse/ser:loginReturn/ser:clientSession
In the “Target” panel, ensure “Create Test Person” is selected, and the property is set to “Request”. Then set the following XPATH within the textbox:
declare namespace soapenv=“http://schemas.xmlsoap.org/soap/envelope/”; declare namespace ser=“http://services.ws.itim.ibm.com”;
declare namespace mod=“http://model.ws.itim.ibm.com”; //soapenv:Envelope/soapenv:Body/ser:createPerson/ser:session/mod:clientSession
Click “Run” to execute the XPATH. The client session value will now be copied from the “Login” response to the “createPerson” request. This also needs to be performed for the Session ID. Use the following XPATHS.
Source
declare namespace soapenv="http://schemas.xmlsoap.org/soap/envelope/"; declare namespace ser="http://services.ws.itim.ibm.com"; //soapenv:Envelope/soapenv:Body/ser:loginResponse/ser:loginReturn/ser:sessionID
Target
declare namespace soapenv="http://schemas.xmlsoap.org/soap/envelope/"; declare namespace ser="http://services.ws.itim.ibm.com"; declare namespace mod="http://model.ws.itim.ibm.com"; //soapenv:Envelope/soapenv:Body/ser:createPerson/ser:session/mod:sessionID
Now that we have the session information, we should be able to execute our first run of the test case. Go back to the test case dialogue, and click “Run”. If all goes well, you should see a green FINISHED graphic. You should be able to see the Person in the TIM Pending requests view.
You may have noticed that although we can now successfully create a person in TIM, we’re not actually verifying that the person is being successfully created. TIM is asynchronous, so the response to the “createPerson” request is a “requestID” and a status that states that the request is in a “not started” state.
What we really want to know is if the person has been successfully created without checking through the GUI. To do this, we’re going to use a Loop within the TestCase to periodically poll TIM to check the response status. Once the request has been processed, we’ll then programmatically evaluate whether it was successful. Manual verification be gone! Create a new SOAP message called “Get Request Wait” for the ““WSItimServiceSoapBinding -> getRequest” request. Set the body as follows:
<soapenv:Envelope xmlns:soapenv="http://schemas.xmlsoap.org/soap/envelope/" xmlns:ser="http://services.ws.itim.ibm.com" xmlns:mod="http://model.ws.itim.ibm.com">
   <soapenv:Header/>
   <soapenv:Body>
      <ser:getRequest>
         <ser:session>
            <mod:clientSession>?</mod:clientSession>
            <mod:enforceChallengeResponse>false</mod:enforceChallengeResponse>
            <mod:locale>
               <mod:country>AU</mod:country>
               <mod:language>en</mod:language>
            </mod:locale>
            <mod:sessionID>?</mod:sessionID>
         </ser:session>
     <!-- This is where the request ID will be set by the property transfer -->
         <ser:requestId>?</ser:requestId>
      </ser:getRequest>
   </soapenv:Body>
</soapenv:Envelope>
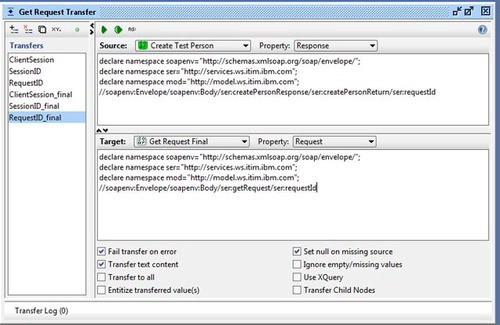
We need to create an additional SOAP message, using the same syntax as above, but it needs to be called “Get Request Final”. This is the message we’ll eventually use to verify the completion status. Before we do that, create a new “Property transfer” called “Get Request Transfer” above the first “Get Request” message. Create the following transfers within this:
Transfer: ClientSession
Source: Establish Session
Source Property: Response
Source XPATH:
declare namespace soapenv="http://schemas.xmlsoap.org/soap/envelope/";
declare namespace ser="http://services.ws.itim.ibm.com";
//soapenv:Envelope/soapenv:Body/ser:loginResponse/ser:loginReturn/ser:clientSession
Target: Get Request Wait
Target Property: Request
Target XPATH:
declare namespace soapenv="http://schemas.xmlsoap.org/soap/envelope/";
declare namespace ser="http://services.ws.itim.ibm.com";
declare namespace mod="http://model.ws.itim.ibm.com";
//soapenv:Envelope/soapenv:Body/ser:getRequest/ser:session/mod:clientSession
Transfer: SessionID
Source: Establish Session
Source Property: Response
Source XPATH:
declare namespace soapenv="http://schemas.xmlsoap.org/soap/envelope/";
declare namespace ser="http://services.ws.itim.ibm.com";
//soapenv:Envelope/soapenv:Body/ser:loginResponse/ser:loginReturn/ser:sessionID
Target: Get Request Wait
Target Property: Request
Target XPATH:
declare namespace soapenv="http://schemas.xmlsoap.org/soap/envelope/";
declare namespace ser="http://services.ws.itim.ibm.com";
declare namespace mod="http://model.ws.itim.ibm.com";
//soapenv:Envelope/soapenv:Body/ser:getRequest/ser:session/mod:clientSession
Transfer: RequestID
Source: Create Test Person
Source Property: Response
Source XPATH:
declare namespace soapenv="http://schemas.xmlsoap.org/soap/envelope/";
declare namespace ser="http://services.ws.itim.ibm.com";
declare namespace mod="http://model.ws.itim.ibm.com";
//soapenv:Envelope/soapenv:Body/ser:createPersonResponse/ser:createPersonReturn/ser:requestId
Target: Get Request Wait
Target Property: Request
Target XPATH:
declare namespace soapenv="http://schemas.xmlsoap.org/soap/envelope/";
declare namespace ser="http://services.ws.itim.ibm.com";
declare namespace mod="http://model.ws.itim.ibm.com";
//soapenv:Envelope/soapenv:Body/ser:getRequest/ser:requestId
Transfer: ClientSession_final
Source: Establish Session
Source Property: Response
Source XPATH:
declare namespace soapenv="http://schemas.xmlsoap.org/soap/envelope/";
declare namespace ser="http://services.ws.itim.ibm.com";
//soapenv:Envelope/soapenv:Body/ser:loginResponse/ser:loginReturn/ser:clientSession
Target: Get Request Final
Target Property: Request
Target XPATH:
declare namespace soapenv="http://schemas.xmlsoap.org/soap/envelope/";
declare namespace ser="http://services.ws.itim.ibm.com";
declare namespace mod="http://model.ws.itim.ibm.com";
//soapenv:Envelope/soapenv:Body/ser:getRequest/ser:session/mod:clientSession
Transfer: SessionID_final
Source: Establish Session
Source Property: Response
Source XPATH:
declare namespace soapenv="http://schemas.xmlsoap.org/soap/envelope/";
declare namespace ser="http://services.ws.itim.ibm.com";
//soapenv:Envelope/soapenv:Body/ser:loginResponse/ser:loginReturn/ser:sessionID
Target: Get Request Final
Target Property: Request
Target XPATH:
declare namespace soapenv="http://schemas.xmlsoap.org/soap/envelope/";
declare namespace ser="http://services.ws.itim.ibm.com";
declare namespace mod="http://model.ws.itim.ibm.com";
//soapenv:Envelope/soapenv:Body/ser:getRequest/ser:session/mod:clientSession
Transfer: RequestID_final
Source: Create Test Person
Source Property: Response
Source XPATH:
declare namespace soapenv="http://schemas.xmlsoap.org/soap/envelope/";
declare namespace ser="http://services.ws.itim.ibm.com";
declare namespace mod="http://model.ws.itim.ibm.com";
//soapenv:Envelope/soapenv:Body/ser:createPersonResponse/ser:createPersonReturn/ser:requestId
Target: Get Request Final
Target Property: Request
Target XPATH:
declare namespace soapenv="http://schemas.xmlsoap.org/soap/envelope/";
declare namespace ser="http://services.ws.itim.ibm.com";
declare namespace mod="http://model.ws.itim.ibm.com";
//soapenv:Envelope/soapenv:Body/ser:getRequest/ser:requestId
Now we need to establish some loop logic. Create a new Property Transfer called “Loop Status” between “Get Request Wait” and “Get Request Final”. Now, click on the test case name, “TestCase1” in my case, and then click the “Test Properties” tab in the lower left hand corner. Add a new property called “getRequestStatus”. Back in the “Loop Status” property transfer, create the following transfer:
Transfer: Job Status
Source: Get Request Wait
Source Property: Response
Source XPATH:
declare namespace soapenv="http://schemas.xmlsoap.org/soap/envelope/";
declare namespace ser="http://services.ws.itim.ibm.com";
declare namespace mod="http://model.ws.itim.ibm.com";
//soapenv:Envelope/soapenv:Body/ser:getRequestResponse/ser:getRequestReturn/ser:processStateString
Target: TestCase1
Target Property: getRequestStatus
This transfer uses XPATH to copy the request status into the “getRequestStatus” property/variable. We now need a piece of Groovy code to evaluate the status. Within the TestCase, add a new “Groovy Script” below “Loop Status”, called “While Loop”. Within the script, copy the following Groovy script, which will act as our loop logic.
//This retrieves the status from the testCase property
status = testRunner.testCase.getPropertyValue("getRequestStatus")

//Prints out the job status
log.info "Job Status: " + status;
/*If the record hasn't processed yet, loop back around.
These are the various TIM5.1 processing states. If it is one of
these states, go back up to the Get Request Wait Step. Repeat the loop
until it has finished processing.
*/
if(status == "In Process" || status == "Running" || status == "Not Started")
{
 //Sleep for 10 seconds.
 Thread.sleep(10000);
    //Loop back to the request
  testRunner.gotoStepByName("Get Request Wait");
}
The above loop logic will exit out when the request state, retrieved by the “Get Request Wait” request, isn’t in the state “In Process”, “Running” or “Not Started”. The key now is to verify whether the request state, once it has finished processing, is successful. We can do this using an assertion on the “Get Request Final” request. Assertions in SOAPUI allow you to apply rules against responses to validate that the response received is correct. Open the “Get Request Final” request, and then click the “Assertions” button in the bottom left corner of the dialogue.
Add a new insertion, called “XPATH Match”, and enter the following values into the dialogue:
declare namespace soapenv="http://schemas.xmlsoap.org/soap/envelope/";
declare namespace ser="http://services.ws.itim.ibm.com";
declare namespace mod="http://model.ws.itim.ibm.com";
//soapenv:Envelope/soapenv:Body/ser:getRequestResponse/ser:getRequestReturn/ser:statusString

Expected Result:
Succeeded
This assertion will check that the response received from TIM is successful. Now that the assertion is in place, we can go back to the test case and run it. This code will now establish a session with TIM, create a person, and then verify that the person has been successfully created. Although this example is fairly basic, this kind of automated unit testing can significantly decrease the amount of time spent developing and verifying TIM Workflow code, as we can create new objects in a matter of seconds, instead of having to tediously do it through the web-interface. This same logic can be applied to not just “Person” objects, but to anything that can be created through the API. The workflow sky is really the limit..
To get you started, a standalone SOAP-UI project containing this example can be downloaded from Github.